Industrial Design
This summer I decided to change my major from Mechanical Engineering to Industrial Design. I enjoyed the challenge of learning the math and science behind engineering but I just couldn't see myself doing it everyday for the rest of my life and enjoying it. Industrial Design is the field of designing and developing new products. This is something that I have wanted to do since I was about 12 years old. I had always planned on designing cars. So when I got home from my mission and heard that BYU had discontinued it's "Trans" program I decided to look at some alternate fields of study. It took me a few years to figure it out but after studying art, graphic design, and mechanical engineering I ended up doing exactly what I wanted to do in the first place: Industrial Design.
BYU's ID program is the most competitive program at BYU. First you have to submit an application to be accepted to the "Pre-Professional Program". If you're one of the 40 (of 80 applicants that apply) that are accepted you take one semester of classes and then submit your work in a portfolio to await acceptance into the "Professional Program". Of that 40 only about 20 are accepted into the program based on a review of the portfolios by the four BYU ID professors. So, the first semester is over and I've submitted my portfolio. All that's left to do is wait to see if I get accepted into the Professional Program.
This was probably one of the hardest semesters of my college career. It was also the most enjoyable. It's the first time I've had to Juggle work, school, church, and a baby. I've never pulled so many all nighters in my entire life. I've also never enjoyed doing homework so much. Hope you enjoy the final results. Comment if you think I should get into the program.
These are some of the final photos I took of my 3D plane exercise.
This project was super tricky because I had to construct it in 3D space. In other words I couldn't figure it out flat on my desk, I had to tape the individual pieces so they would stand upright on my desk and then measure and cut and all of the 6 pieces interact with each other so every cut affects everything else.
So this is actually the second one I made because the first one (pictured below) had cuts and guide lines and writing all over it.
These are my finals for my "Visualization Methods" class which was basically a sketching class where we learned the principles of "rapid vis" which is a sketching technique. It was probably my favorite class out of the four. Sketching is something I've done my entire life so I thought I knew everything but I learned a ton about shading and shadows and line weight and perspective. I can't wait to become a professional designer so I can just sketch new products all day long.
3D pattern exercise
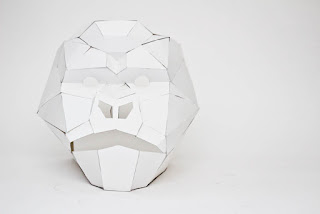
Working on my gorilla mask. This was my first project in my "Form and Surface Development" class. We all cut and folded a pre made pattern for a mask in class just to get the idea (the fox). I immediately decided I wanted to do a gorilla because it's my favorite animal but my first rendition looked more like a pig. Transferring an idea from 2D to 3D is harder than it looks.
This is the hot wire cutter we used to cut the polystyrene foam blocks. It's fun but it takes a lot of practice to get straight cuts.
This was a project for my "Structured Creativity class". The assignment was to "revalue" something or to give value to an object that no longer had value. I texted my dad and my bros and asked them if they had any junk that they had potential.
John's old skateboard deck was perfect. I figured a couple handles would turn it into a grippy breakfast in bed tray. The grippy surface was perfect because plates and cups are always sliding around on the tray (or on the blankets) while you're trying to figure out how to eat in bed. My dad let me use his power tools to make some rough modifications and transform this valueless old deck into valuable house ware.
Painting polystyrene blocks. This was for my "Form and Surface Development" class. This night was one of the all nighters.
This was one of my favorite projects. In my "Structured Creativity" class we had to go to Home Depot and walk through all the isles. While we were there we had to pick out a few items to make a purse out of. The catch was that we weren't allowed to spend over $15 on the supplies. It was fun looking at every different thing in store and imagining it as a purse. As soon as I saw the cork I loved it and I thought it would make a nice feminine material. The frame is made of two 30 cent plastic paint rolling trays with a packing tape hinge between the two.
Blind Contour Drawing
spheres, cylinders, and conic sections
One of our first projects in our "Structured Creativity" class was to redesign the McDonalds fry box. But before we even knew that was the objective, the first part of the assignment was to go to McDonalds and observe. This was one of my favorite projects of the semester because of the experience. I got to interview a bunch of people about their fry eating experience and learn a lot about different eating behaviors as well as the life cycle of the fry box. Industrial Design is more about designing an experience than just designing an object.
Redesigning the can opener.
Wire cutter fun.
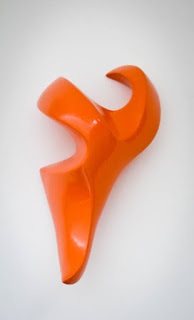
Over the Thanksgiving break our "Form and Surface Development" teacher sent us an email. It basically said: Oh, by the way, I forgot to tell you in class but I need everyone to bring a bone to class next Tuesday. One that hasn't been cut or broken, preferably mammal. At first I thought it was a joke but it turned out to be the basis of our final project for the class. My wonderful wife Amanda who was usually more concerned about my projects than I was talked to someone at work who had some pig vertebras laying around. When we went to class on Tuesday we looked at all of the bones and talked about some general characteristics of bone forms. Many have a ball and socket feature. Many have repeated spurs called "processes". Many have a scroll-like element at the end. Some have little holes for vessels. Most are long and thin with twists. They usually have rounded edges in some places and sharp creased edges in other places. Our final project was to be an abstract shape that had bone-form like characteristics made of polyurethane foam.
"Frisbek" is a german word that means several objects coming together as a whole. Not really, it's just a made up word. Here are some of the Frisbeks we came up with. We had to present someone else's to the class as a product, make up a name for it, and describe what it's used for based on a price tag that our teacher would give us as we were walking up to the front to present. The price tag for the product could be anywhere between $5 and $5,000,000 making a big difference in what the product would actually be.
Rock-like form with concavities
Here's my bone form in the raw polyurethane stage.
I just about lost my index finger after this night.
I spent two all nighters on this one.
One shaping it and spackling it.
And another priming, sanding, priming, sanding, priming, sanding, and painting it.
...and sanding it
...and painting it again.
This was an idea I had to change the purse handles before I photographed it for my portfolio. Amanda and I stayed up really late working on it and I never ended up using it.
These were some of my drafts for the bone form. None of them quite worked.
Here's some of the final photos I took for my portfolio.
This was to show how much the purse could hold. Works well for sneaking drinks and treats into the theater.
One of the final projects in our "Structured Creativity" class was to construct a "mechanism". Using a specified amount of foam core, one wooden dowel, string and rubber bands we were to convert motion 4 times, each time converting to a different kind of motion (linear motion, pivotal motion, circular motion, random motion, etc.).
This was definitely one of the hardest projects of the semester. Most students in the class (probably none of them) had never done anything like this. It was fun to learn how moving parts work and realize that just because something works in your head doesn't mean the constructed model will work.
This was a pattern exercise for my "Visual Literacy" class.
"Perceptual Painting" exercise
One of the affordances of the cork material is that it already had an adhesive on it so I could exacto out a cool logo and then just peel and stick.
Rhythm exercise
Stone Twin
One day for our form and surface development class our professor took us on a walk through campus. We walked to one of those fake streams that they turn off during the winter. He told each of us to find a smooth rounded river stone.
Our first assignment with the polyurethane, we had to make a stone twin. I enjoyed watching my raw foam material slowly transform into a copy of the object I had in front of me. I learned quickly that every change you make from one angle is going to change something from a different angle.
Stone Cousin
This stone-like form was easier because we didn't have to copy anything.
We just had to make a form with river-stone-like characteristics and a couple concavities.
White polystyrene block compositions with dominant, subdominant, and subordinate elements.
Boolean compositions (an "or", an "and", and a "not") (of a cylinder and a cube).
Boolean foam fun


